You cannot use ternary operators in this course. Doing so will result in receiving no credit for the project.
Project 06: BeaverMaps
In this project, you will build the backend of an application like Google Maps.
Goals and Outcomes
By the end of this project, you will…
- have implemented a graph from existing data sets
- have implemented an autocompleter for searching terms in a database
- have implemented several fundamental graph algorithms
- have a working maps application that can find paths in real data
Overview
You will be implementing graph algorithms to drive a maps application in which you can find nearby buildings and shortest paths between locations, as well as an autocompleter to enhance the search function on the application.
You should copy forward all your JSON-related code from project05. (If you happen to see a lot of red underlines, make sure the top of the file says package edu.caltech.cs2.project05;.) (Furthermore, you may copy your HTMLManager and HTMLParser code, but they are not required for this project.)
Connection to Lecture
This project covers the lectures relating to graphs, up to the lecture about A-star.
An All-Purpose Graph
This project uses the Graph class you’ve seen in the previous project, which implements the IGraph interface. You should read the interface documentation again to re-familiarize yourself with the methods.
Task 0.
Refresh your knowledge of the IGraph interface and the Graph class.
Building the BeaverMapsGraph
Now that we have an all-purpose graph, we will extend on it for the specific case of Open Street Map data. Open Street Map is a free
croud-sourced map of the world. The format (called osm) that Open Street Map uses is a form of XML, but we think it’s easier and more useful to use JSON; so, we have downloaded
and processed the specific pieces of the data for Pasadena into three JSON files: pasadena.buildings, pasadena.waypoints,
and pasadena.roads. We have also included a smaller data set for just Caltech. All these files are in the data folder. The first thing you will need to do in your BeaverMapsGraph class is
write the constructor which should process each of the three files into vertices and edges in your graph. Open Street Map uses long IDs for each entity which will
be the vertices in our graph. Edges are defined by the roads file, where each entry in the list represents multiple edges
(one between each consecutive pair of vertices in the inner list). Note that all buildings are locations but not all locations are buildings!
To parse the buildings file, you should write something like this:
1
2
3
4
5
6

JSONList bs = (JSONList) JSON.parse(getFileText(buildingsFileName));
for (JSON b : bs) {
    Location loc = new Location((JSONObject) b);
    System.out.println("One of the locations is " + loc);
}
The other two files will be similar. Make sure the edge weights in the graph are the distances between Locations (you may find the Location.getDistance
method to be helpful here).
Task 1.
In BeaverMapsGraph.java, write the parsing code in the constructor BeaverMapsGraph(String buildingsFileName, String waypointsFileName, String roadsFileName).
Task 2.
Once you’ve imported the files, there are some other methods you should implement. In particular, getLocationByName, getLocationByID, getBuildings, addVertex, and
getClosestBuilding. The specifications for these are in the documentation in the BeaverMapsGraph class.
At this point, if you run the maps application, you should be able to click on a location and see the location name pop up! The ``Find All Buildings’’ feature should also start working.
Finding Nearby Locations
Your next task is to make the ‘‘Find Places Nearby’’ functionality work. To do this, you should implement a depth-first search in the dfs method,
which stops searching outwards if the distance from the start location is larger than the provided threshold. This does not mean the length of the path from the start to the location.
The idea is to search all paths out of the start node until we reach a location that is too far and then backtrack.
Task 3.
Implement the dfs method.
Autocomplete
Imagine searching in a movie database for a movie you want to watch. If you type the words “age of” into the searchbox, suggestions such as “The Avengers Age of Ultron” and “Transformers Age of Extinction” should come up. Now, imagine searching for the word “home” in Google Maps. Suggestions such as “home”, “home depot”, and “home gardens” should come up. We can implement this using a data structure called a TrieMap, which implements an interface called ITrieMap. The TrieMap uses a data structure called a trie.
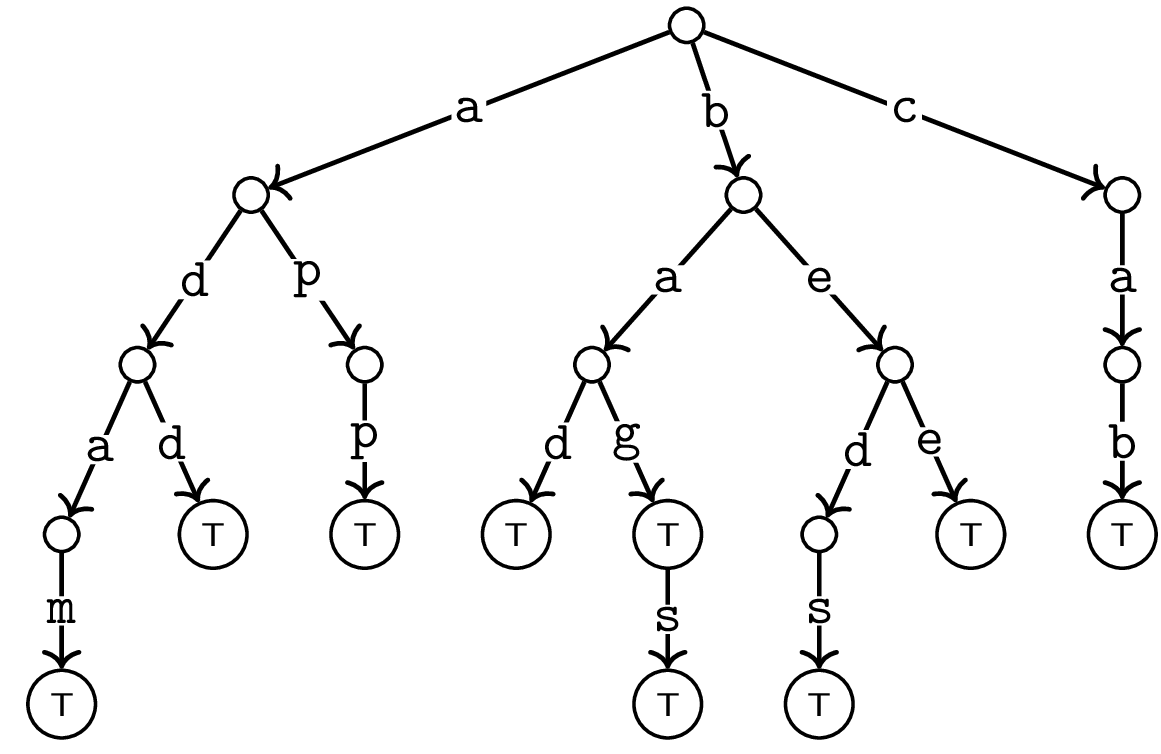
A Trie is a dictionary which maps “strings” to some type. Unlike other trees that we’ve seen previously, each node only contains a single “letter”.
For example, here is a trie that represents the words {adam, add, app, bad, bag, bags, beds, bee, cab}:
You should be familiar with using a HashMap and a TreeMap at this point. So, we’ll start with a comparison to those.
Comparing ITrieMap to HashMap and TreeMap
It helps to compare it with dictionaries you’ve already seen: HashMap and TreeMap. Each of these types of maps takes
two generic parameters K (for the “key” type) and V (for the “value” type). It is important to understand that
Tries are NOT a general purpose data structure. There is an extra restriction on the “key” type; namely, it must be made
up of characters (it’s tempting to think of the Character type here, but really, we mean any alphabet–chars, alphabetic letters, bytes, etc.).
Example of types that Tries are good for include: String, byte[], List<E>. Examples of types
that Tries cannot be used for include int and Dictionary<E>.
In our implementation of Tries, we encode this restriction in the generic type parameters:
-
A: An “alphabet type”. For aString, it would beCharacter. For abyte[], it would beByte. -
K: A “key type”. We insist that all the “key types” extendIterable<A>which encodes exactly the restriction that there is an underlying alphabet. -
V: A “value type”. There are no special restrictions on this type.
We can use a data structure called a TrieMap to store information. Consider the TrieMap below:
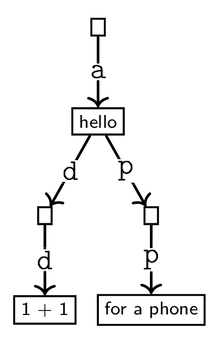 .
.
Now consider that “add” and “app” can each be represented as a List of Strings, namely [“a”, “d”, “d”], [“a”, “p”, “p”]. Similarly, every location name can also be represented as such. For instance, let’s say we iterate over all locations in our dataset and the first location name is “Home Depot”, then we know that in our trie the Lists [“h”], [“h”, “o”], [“h”, “o”, “m”], [“h”, “o”, “m”, “e”], and so on should all map to a List that includes the entry “Home Depot” as a potential location. Note that all the letters are Strings, not chars. Now, if the second location name is “HomeGoods”, then we know that the Lists [“h”], [“h”, “o”], [“h”, “o”, “m”], [“h”, “o”, “m”, “e”] should also map to include the entry “HomeGoods”.
We must also consider location names with multiple words. For example, if someone searches “depot”, they should also see “home depot” as a suggestion.
To resolve this we also add lists of entire words to our TrieMap. Thus, [“depot”], and [“home depot”] should also be keys in the TrieMap that map to lists that include the entry “Home Depot”. Furthermore, someone might search for a location by its address instead of its name, so addresses must be put into the TrieMap as well. For addresses we only want to separate by words as well.
You will be implementing two methods in MapsAutoCompleter.java to finish the autocomplete functionality. In the populateLocations method, we take a set of Locations in our database and add to a TrieMap locs, and in the complete method, we use locs to provide a list of location IDs as suggestions for a search term. In locs, every list of words maps to a list of Locations that could arise from searching those words in that order.
You should be aware of the following two methods for populateLocations.
Java’s Arrays.copyOfRange(String[] arr, int from, int to) method creates a new array containing all entries in arr from from (inclusive) to to (exclusive). Our listFromArray(String[] arr) helper method converts an array into a list. Below is the basic structure for this method:
private void populateLocations(Set<Location> locations)
- Note that
locsis of typeTrieMap<String, List<String>, List<Location>>, meaning that every List of Strings maps to a List of Locations - For every location in locations:
- Check if the name is null; if so, ignore this location!
- For every letter in the name:
- Consider the list of letters from the beginning of the name up to that letter
- Add this location to the List that that list maps to in
locs
- For every word in the name:
- Consider the list of words from that word up to the end of the name
- Add this location to the List that that list maps to in
locs
- Check if the address is null, if so ignore this location
- For every word in the address:
- Consider the list of words from that word up to the end of the address
- Add this location to the List that that list maps to in
locs
Task 4.
Implement the populateLocations method in MapsAutoCompleter.java.
Note: when adding to the TrieMap, you should use the toLowerCase() function to add everything as lowercase for consistency.
Now, you will implement complete. Given a String term that the user types in, this method returns a List of longs, the IDs of the locations it suggests. The list should include the IDs in ascending order, and there should be no repeat IDs (hint: what data structure ensures no duplicates, and can preserve some sort of order?).
For this method, you may find our helper method charArrToStringIterable and the TrieMap method getCompletions helpful.
Note that in the TrieMap class, getCompletions(K prefix) should return a List filled with the values of all descendants of the prefix. For example, in the example picture above:
getCompletions("") = getCompletions("a") = ["hello", "1 + 1", "for a phone"].
Task 5.
Implement the complete method in MapsAutoCompleter.java.
Note: recall that everything has been stored in your TrieMap as lowercase! The search term is not necessarily in lowercase when it is passed in.
Hint: there are two ways a search term can correspond to results. First, consider all the characters in the term (e.g., ["h"], ["h", "o"], ["h", "o", "m"], ["h", "o", "m", "e"]). Second, consider a list of all the words in the search term (e.g., ["depot", "home depot"]).
Finding Shortest Paths Between Locations
Dijkstra’s’ Algorithm
Your next task is to make the ``Find Route’’ functionality work. To do this, you should implement Dijkstra’s Algorithm in the dijkstra method, to compute the shortest path
between two locations. Do not add buildings to your path except the start and end ones. Make sure to use the adjacent method to find the edge weights (not getDistance).
Unlike in lecture, you will need to only add things you’ve actually seen to the priority queue, because we are working on a very large data set.
Task 6.
Implement the dijkstra method. If you choose to stop here, scroll to the bottom of the guide to the In Use section.
A* (“A-Star”)
Now, you will add another path-finding algorithm to the Find Route functionality. The A* algorithm works very similarly to Dijkstra’s, with an additional factor of a heuristic function. Once again, we have a priority queue, commonly called a frontier, where the elements represent vertices in the graph and the priorities are the costs. The cost in A* is what we will call an f-score, and is calculated as: for a vertex v, f(v) = g(v) + h(v), where f(v) is the f-score, g(v) is what is called a g-score, and h(v) is the heuristic function applied to v. The g-score is the same thing as the cost, or distance, in Djikstra’s algorithm. h(v) measures an estimate of the cost to get from v to the target. One interesting thing to note is that if h(v) = 0.0 for all v, then A* works exactly the same as Dijkstra’s algorithm. Just as in Dijsktra’s, we continuously explore and process the next element in the frontier in the A* algorithm.
Your next task will be to implement the A* algorithm in the aStar method. This will compute the shortest path between two locations, generally more quickly than Dijkstra’s. Again, do not add buildings to your path except the start and end ones, and make sure to use the adjacent method to find the edge weights.
Task 7.
Implement the aStar method. This method takes in a parameter BiFunction<Location, Location, Double> heuristic, which is the heuristic function. If you want to find the heuristic value h(curr) for some location curr, you can call heuristic.apply(curr, target). You do not need to worry about which function the heuristic function is; your implementation of aStar will be general for any heuristic function.
In Use
Task 8.
If you’ve completed everything up to task 6 (dijkstra), you can go take a look at your code in action. In the project06 folder, you will find a file called BeaverMaps.java. If you implemented aStar, in BeaverMaps.java, set the field USE_A_STAR to true. Running that file will open up our own “Beaver Maps” application in your browser. You can type your own locations in the “Search” tab, and your own dfs method will find that location on the map; or, you can head over to the “Route” tab and type in two locations, and your own dijkstra and/or aStar methods will find a shortest path between those two places. The path found by dijkstra will be in blue and the path found by aStar will be in red; often, these two paths will overlap. You can also see how much time dijkstra and aStar took to run!
Gitlab Tests: there are no Gitlab tests for this project! We will grade by cloning and running your tests locally. Please push your code to Gitlab once you have completed your project.
If you see a failed pipeline on Gitlab, you can ignore it.